This time, you’d want ZERO!
Ogre
31 Jul 2009
With the help of Brahma and Adeng. There are a lot of self-help guides and how-tos when it comes to zeroing a riflescope. You can knock yourself out skimming through the myriad of resources found on the Internet. However, before you start tweaking that scope of yours, there are some things that you should take into consideration first. It is very important that you know your airsoft rifle’s rated muzzle velocity and its maximum effective range, as well as how it performs on different BB weights.
Pre -sighting
Before you even attempt to “zero” your scope, it is important that the scope is pre-sighted to the rifle first. Collimating, the most accurate and simple technique for pre-sighting is the system most often used by gunsmiths. It can be done quickly in the shop before leaving for target practice.
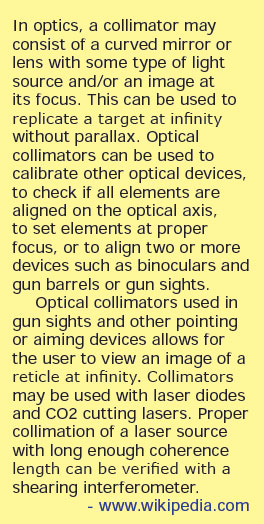
What is collimating?
“Collimating is to align a scope’s optical components (lenses, mirrors, prisms, and eyepieces) in their proper positions to give the best image possible. This should be accurately done or else the image quality will suffer.”
If a collimator is not available, “bore-sighting” is the recommended alternative, especially for spring-powered bolt-action rifles (BARs) or bolt-action sniper rifles (BASRs). In your backyard, set the scoped rifle up on a steady platform and place a target at about 20 or so paces or according to your sniper rifle’s optimum range. With the bolt removed, look through the bore until you can see the bull’s eye centered in the inner barrel.
Without moving the rifle from this position, glance through the scope and note where the reticle is positioned on the target. If the scope reticle is not closely aligned to target center, you need to adjust the base mounting screws. Do NOT use the scope windage and elevation adjustments for these pre-sighting adjustments or you will run out of adjustment for final zeroing.
At the “bore-sighting” or pre-sighting stage, it is important that all sighting adjustments are done on the mounting screws only (the scope’s internal windage and elevation screws are only to be used for final adjustments). To increase elevation adjustments (when necessary), the only way around this is to shim. Shims 0.025mm-thick, placed under the rear of the mount base will raise the point of impact about 7in. To lower the point of impact, place the shim stock under the front end of the base.
Zeroing a scope
The range at which a scope should be zeroed is a matter of personal judgment. If you anticipate using the scope at distances of about 30m or less, naturally a 30m zero is appropriate.
If possible, zero in a no-wind condition to establish a standard zero. If you must zero in a wind, make a note of the amount of drift attributable to wind effect and when finally zeroed, make a compensating adjustment to leave the scope at standard (no-wind) zero.
Also, this procedure is best done in the prone position, as it reduces shoulder/upper body movement.
1. Place rifle in a flat area, secured and level on the ground using bipod or your pack.
2. Set your hop based on the effective range of the rifle and projectile to be used.
3. Loosen all screws on the scope mount just enough to adjust the scope by hand.
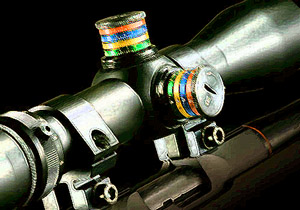
4. Position your head in the cheek piece (most comfortable) and with both eyes open, move the scope back and forth until you see a bright image. Your shooting eye must be 2in to 3in between the eyepiece of the scope, otherwise known as eye-relief.
5. Align the vertical crosshair to the barrel and make sure that the horizontal cross hair is parallel to the ground.
6. Tighten the screws alternately. This will give even pressure on both sides of the ring mounts.
7. Get cardboard or paper and draw a circle about 3in in diameter with another one inside for about 1in in diameter. Draw a small dot inside.
8. Place the target half the distance of you rifle’s effective range (or about 20 or so paces). Do not expect to hit the center on the first shot, ok? Just make sure that you hit the target.
9. At this time, your point of reference is the small dot inside. Now, take your first shot. Wherever it lands, that is now your second reference point. From that spot, adjust the elevation knob up or down (this depends on the distance between reference 1 and 2).
10. Then take a shot again and adjust if necessary. Your objective is to parallel reference 2 to reference 1.
11. Repeat the process until it is horizontally aligned. If you accomplish the objective, you are now shooting straight and vertically zeroed.
12. Now that you have reference 1 and 3 aligned, adjust the windage knob left to right using the same process. Shoot and adjust (if necessary).
13. If you hit that tiny dot, you are now horizontally and vertically zeroed, ready to take the next step: zeroing on the effective range.
14. Place another paper target. This time on the maximum effective range of the rifle, then repeat steps 1 through 13.
Simple. It’s like learning your A-B-C’s.
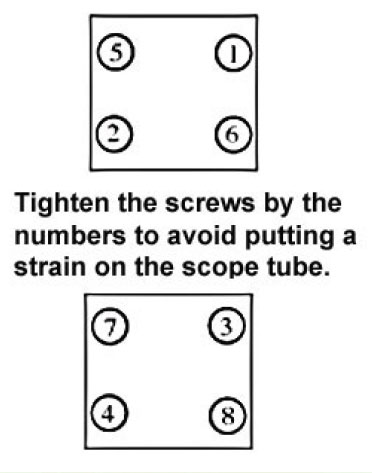
This is the order of screws to tighten in the case of a double screw mount. If you have a single screw on each side then do it as 1-4-5-8. Basically you want pressure to be as even as possible throughout the process and not risk damaging the tube of having uneven pressure on one side that will make zeroing more difficult.